The Ultimate Guide to Android App Development

Image
Published 16 Nov 2021Updated 15 Nov 2022

The usage of mobile phones has skyrocketed with the emergence of smartphones. Smartphones have changed the way we consume content, do business, and go about our daily lives. 85% of the smartphones run on Android, as a result, building an android apps are a prerequisite for any online business worth its salt. This has led to the Google Playstore being flooded by thousands of apps every day. Everything from ordering food, taking a cab, finding employment or entertainment is now just a few clicks away. While hiring an app development agency or company can be a quick way to get to apps, if you have the drive to learn Android App Development, you can develop any number of apps yourself.

In this guide, we will explore how to build an Android app from scratch. This guide is divided into the following sections:

Table of content

  • Introduction To Android
    • Getting Started On Your Android App Development Journey
      • Learn To Create An Android App From Scratch
        • Components Of Android Software Development
          • Privacy and App Permissions
            • Best Mobile App Development Practices for Android
                • Dependency Injection
                  • Testing
                    • Setting a Testing Environment
                      • Noting down Evaluative Tests
                        • Accessibility
                        • Android Application Development FAQs
                          • How Long will it Take to Make an Android App and Launch it?
                            • How Essential is App Testing for an Android Developer?
                              • How to Build Android Apps using React Native?
                                • Is Setting Permissions an Important part of App Development?
                                  • How Much Does it Cost to Develop an Android app?
                                    • How to Make an Android App from Scratch?
                                      • How to Create an Android App that is User-friendly?
                                        • How to Become an Android App Developer?
                                          • How to Build an Android App using Java?

                                        Introduction To Android

                                        About 2.5 billion devices run on the Android operating system. Phones, Televisions, Tablets, Cameras, Game consoles, Car systems, and Smart wearables are some of the device types powered by Android. Hardware configurations of android devices differ from one device to another, but an android operating system provides support for common features such as storage, cameras, connectivity, messaging, and more.

                                        Through the Android platform, Android devices provide notable features, some of them include: Widgets-allows access of information at a glance on the home screen, such as weather information; Custom ROMs-a feature that allows modification/customization of android operating systems to suit one’s interest; and QR code reader are some of the common features.

                                        Getting Started On Your Android App Development Journey

                                        Introduction to Android Application Development

                                        Android app development refers to the creation of an android-based mobile application for your business. As an Android app developer your basic toolkit should include proficiency in Java and C++. It is a basic requirement for getting into android mobile app development.

                                        To get started as an Android developer Android provides the following software toolkits for Android app development:

                                        • Software Development Kit(SDK)
                                        • Integrated Development Kit
                                        • Java Software Development Kit(JDK)

                                        SDK provides tools to create, debug, and emulate an application. IDE provides a GUI for SDK tools access and an interface to write codes.Android Studio is the preferred IDE.SDK packages come bundled up in Android Studio inform of SDK Manager. JDK is installed on your computer; it provides an interpretation of the Java program.

                                        Programming Languages for Android Application Development

                                        Android Apps can be written in different programming languages (PL). The choice of a language depends on the level of your skillset in different programming languages; strengths and weaknesses of each PL; and more importantly, what you are trying to achieve with your app.

                                        Some of the languages to build Android Mobile Application:

                                        Java: Android applications are officially developed in Java Language. Java is freely available, secure and user-friendly.

                                        Kotlin: Recently added as, among the official language for Android App development by Google, Kotlin is cross-platform and can interoperate with Java through Java Virtual Machine(JVM).

                                        C/C++: Android through Native Development Kit (NDK) allows development in other indigenous languages such as C and C++. This language is more complicated though.

                                        HTML, CSS, and JavaScript: This can be achieved through the Adobe PhoneGap framework. PhoneGap offers a platform to create an app in web-based languages that run on "WebView."

                                        Android Mobile App Development Bundles

                                        An Android Application Kit (APK) is a file that contains all the components required for your android app to execute. Components contained in an APK file are your written code library and resources like images, languages, and screen size binaries.

                                        Before Android OS 5, an android app could only have one APK, subsequent Android versions support multiple APKs within a single app. Generation of multiple APKs was an inconvenience for developers, Android, therefore, came up with Android Application Development Bundle. This feature is available in Android Studio 3.2 and subsequent versions. It is a recently added upload feature that involves auto generation and the signing of app’s APK files.

                                        You build a mobile app in Android Studio, creating an app bundle in the process. Once you have uploaded your app to Google Play; Dynamic Delivery uses the app bundle you created to automatically generate, sign and serve optimized APK files to your app users as per their device configurations.

                                        Some of the advantages of Android App Bundle system are:

                                        • As a developer, only build one version of the app that includes compiled code and resources; you no longer have to manage multiple versions inform of APKs.
                                        • Users only download your app’s code and resources that are only useful to them, such as their native language (a resource). Anything else unrequired is held back from download.

                                        Learn To Create An Android App From Scratch

                                        In this section, we discuss the process of creating an android app from the ground up. Let us start with a simple task; go over to Android Studio, write a code in Java to display ‘Hello Android Studio.' Afterward, build a GUI interface that accepts textual input and displays the text.

                                        Fundamental Concepts

                                        Foremost, there are two essential conceptions a novice android app developer must understand; the workings of the android app's components and adaptation of your app to different devices.

                                        Android App’s Components

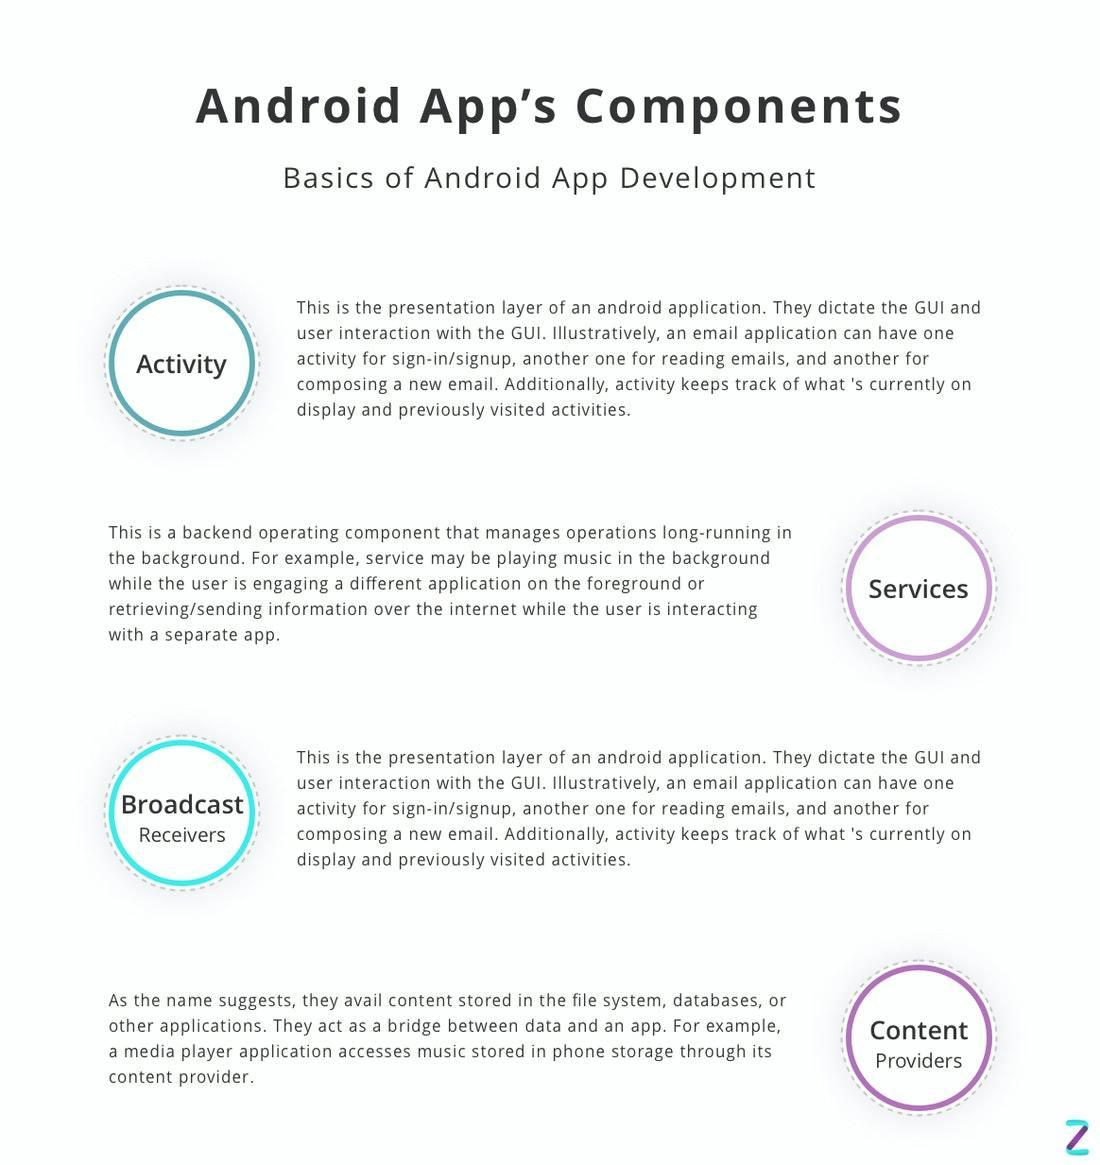
                                        An Android App is made of loosely coupled components that are separately and independently invoked but interoperate within the app ecosystem. App’s AndroidManifest.xml file contains essential information about each component, how they interact, and their hardware configurations, for example. There are four main components:

                                        • Activity- This is the presentation layer of an android application. They dictate the GUI and user interaction with the GUI. Illustratively, an email application can have one activity for sign-in/signup, another one for reading emails, and another for composing a new email. Additionally, activity keeps track of what 's currently on display and previously visited activities.
                                        • Services- This is a backend operating component that manages operations long-running in the background. For example, service may be playing music in the background while the user is engaging a different application on the foreground or retrieving/sending information over the internet while the user is interacting with a separate app.
                                        • Broadcast Receivers- This is an event-driven component, also known as Intent listeners. They listen and receive broadcasts, either from the system or other applications; they then act according to the triggers set in the broadcast. Examples are alarm sets and reminders.
                                        • Content Providers: As the name suggests, they avail content stored in the file system, databases, or other applications. They act as a bridge between data and an app. For example, a media player application accesses music stored in phone storage through its content provider.
                                        Android App’s Device Compatibility

                                        Android Studio provides tools and environment to build an application that can be successfully used in different kinds of android devices. This is done through the type of resources offered. For example, you must provide a resource that allows your application to adapt to different screen sizes, or display in multiple languages. The system decides the kind of resources required based on its hardware specifications.

                                        If your Android application requires specific hardware (like a camera) for it to successfully execute, build it to enquire for the hardware’s availability during runtime, and maybe terminate the execution if the hardware is unavailable. The same goes to permission to access particular information stored in the system or other applications; build your application to request permission, either during runtime or installation. For more on device compatibility, visit Android’s Device compatibility overview.

                                        Steps to Create an Android Project

                                        If you want to build an Android application, you must be ready to invest your resources to ensure your project becomes a success.

                                        As a developer, before installing the Android studio, ensure that your system meets the following minimum requirements.

                                        Minimum System Requirements for Android Studio
                                        • Microsoft Windows 7/8/10 (32 or 64 bit).
                                        • Mac OS X 10.8.5.
                                        • GNOME or KDE or Unity desktop on Ubuntu or Fedora or GNU/Linux Debian.
                                        • 2GB RAM.
                                        • 4GB RAM recommended.
                                        • 500 MB disk space
                                        • 1 GB for Android SDK.
                                        • Java Development Kit (JDK) 7.
                                        • 1280x800 screen resolution.
                                        • A faster processor (according to your budget).
                                        Setting up Android App Development Environment
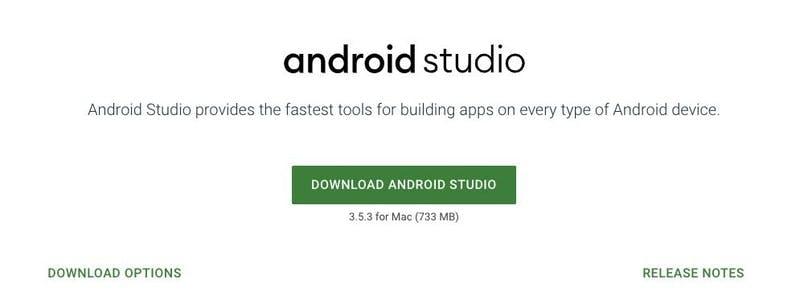
                                        Steps for developing a new Android Studio project
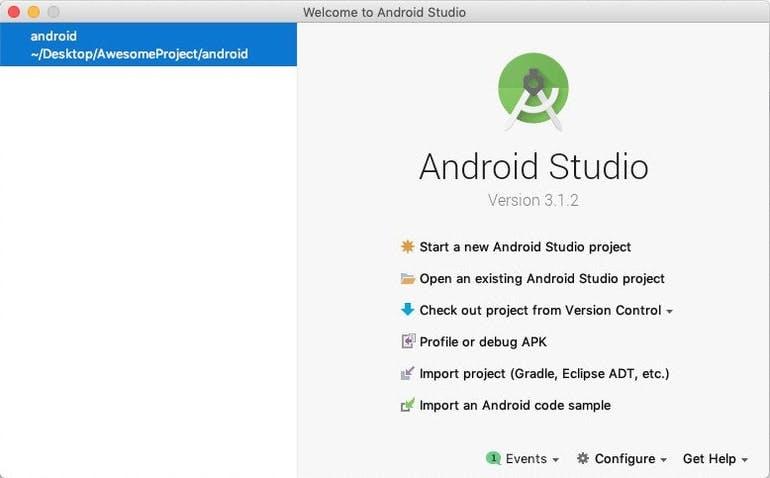
                                        • Open Android Studio, on its welcoming home page, click on Start a new Android Studio project.

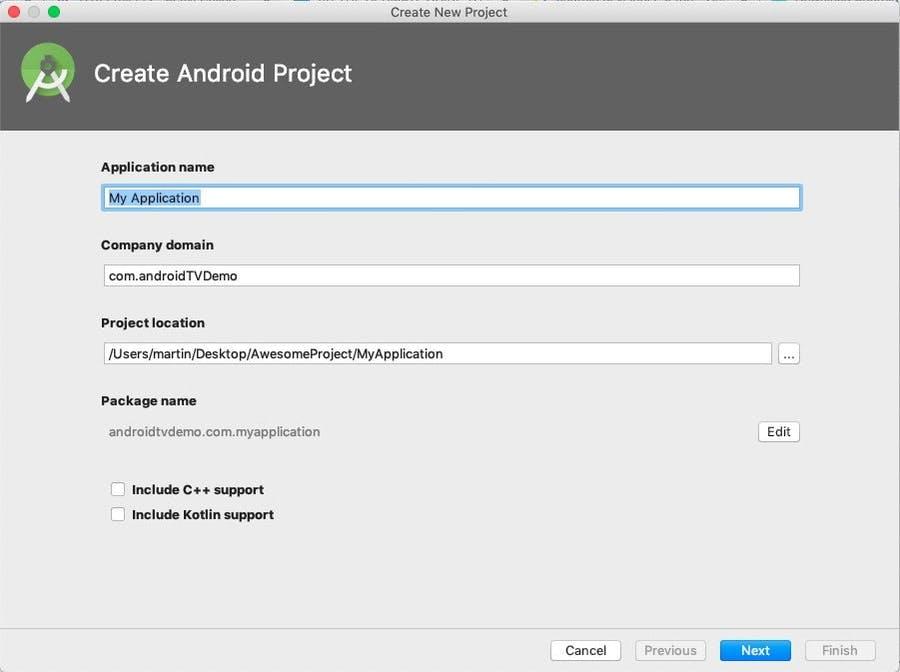
                                        • After that, you will see “New Project Android Studio”. Enter the “Application Name” and the “Company Domain” on their respective text boxes, now click Next.

                                        N/B: “Company Domain” uniquely identifies the application name. Additionally, “Company Domain” is written in reverse, for example, ‘com.mynewapp’.

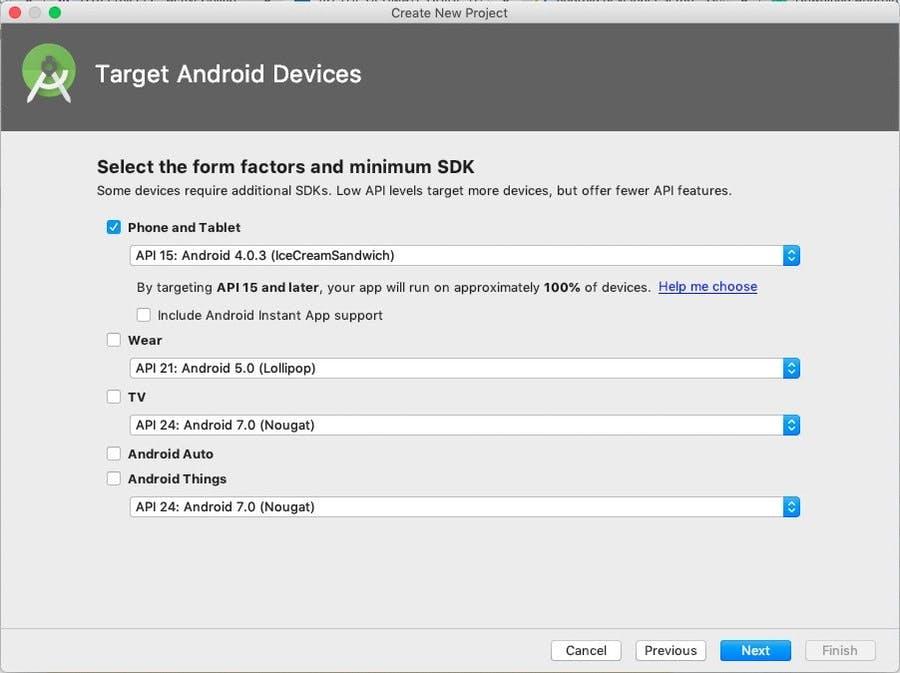
                                        • “Target Android Devices” appears on the next screen. Select the form factors your app will run on. Below every option, there is a must filled field on “Minimum SDK”. Click Next.

                                        N/B: Refer to “Help me choose” link below the Phone/Tablet selection for more guidelines on the minimum SDK requirement.

                                        On the next page, there is “Add an activity to Mobile”. Select Empty Activity. Activity is based on what you are trying to achieve. Examples of Activities on display are; login, scrolling and empty. Click Next .

                                        The next window that appears is titled “Configure your project”. Complete the following:

                                        1. Enter "My New App" in the Name field.
                                        2. Enter "com.mynewtapp" in the Package name field.
                                        • Click on Save.
                                        • Select Java from the Language drop-down menu.
                                        • Select the checkbox next to Use androidx.* artifacts.
                                        • Leave the other options as they are.
                                        1. Click Finish.

                                        After some time, Android main window appears. Now go to View > Tool Windows > Project and review if all the following files are available:

                                        app > java > com.mynewtapp > MainActivity: This is the entry point to your application. After your application is installed and run, the system triggers this Activity.

                                        app > res > layout > activity_main.xml: The XML file dictates the UI layout of your application.

                                        app > manifests > AndroidManifest.xml: Manifest file contains descriptions of your app’s components.

                                        Gradle Scripts > build.gradle: Two files are contained here; one for the project and the other for app module. App module is used to create builds.

                                        Running an Android App

                                        After creating your first Android App, it is time to test your app by running. This section describes how you can run your android application; on a real device and on an emulator.

                                        Testing the app on a Real Device or an Emulator

                                        Connect your phone device to your computer system you have used to develop your app. You have to enable a phone setting called “USB Debugging” for you to run an app on your phone. Here is how to:

                                        • Open Settings App on your phone.
                                        • Scroll down to and open About Phone.
                                        • There is Build Number at the bottom, tap it seven times.
                                        • Return to About Phone, head over to Developer Options, and open it.
                                        • Scroll down to USB Debugging and enable it.

                                        Your phone device is now ready to run your android application. Now, open Android Studio and follow the following steps to test your app.

                                        • On Android Studio, head over to the toolbar and click on run/debug configurations drop-down menu, select your application.
                                        • Still on the toolbar, go to the target device drop-down menu and select the phone device you have connected to the computer and wish to run your app on.
                                        • Now click Run. Android Studio downloads, install and run the application on your phone.

                                        And that’s it! Your phone should be able to display what you had coded to be displayed during development.

                                        Running on an Emulator

                                        Android Studio provides a tool for creation and running of an app emulator. It is done through Android Virtual Device (AVD).Following are guidelines one can refer in creating one:

                                        • In Android Studio, head over to Tools then AVD Manager.
                                        • Click on the Create Virtual Device tab at the bottom of the panel.
                                        • Select Hardware window appears; select a virtual device you may be interested in emulating your app. If virtual device you prefer is not available, create or import one, otherwise click Next
                                        • System Image panel comes up. This is where you select android OS version you prefer, but according to a specific API level. Click NextLearn more about API’s.
                                        • On Verify Configuration page, confirm your settings and do changes where necessary. More settings are on the Show Advanced Settings tab.

                                        Now that you have prepared a virtual device, it is time to emulate your application. Follow the following steps:

                                        • Select your app from run/debug configurations drop-down menu in the toolbar.
                                        • Select a virtual device you created from target device drop-down menu.
                                        • Click Run

                                        Android Studio installs and runs your application on the virtual device, and you should be able to see the display of what you had coded your app to output.

                                        Using Android Studio Layout Editor to Create a Simple UI

                                        As a developer, your obligation is not only to code a fully functional application, but must also address the physical layout of your application in order to appease the user. A good app, apart from device compatibility and functionalities, must have a user friendly user interface. In this part, we review how to build a basic textual form that accepts input and send it to another activity by use of an Android Studio Layout Editor.

                                        Let us start off with two definitions here:

                                        • View: This is a small rectangular shaped object that accepts a user's input and responds to a user’s action. Examples of Views are a textbox and a button.
                                        • ViewGroup: An invisible container holding a view. Example is LinearLayout - a ViewGroup holding a button view. A View held by ViewGroup is termed as a Child.

                                        User interface is made of Layouts and Widgets.

                                        Layouts are ViewGroup entities that define how child views are placed on an android device screen. Widgets are Views that interact with the user, a text input area being an example.

                                        Now, here are steps on how to build a User Interface (UI) with a text box and button.

                                        • Open Layout Editor, and on Project pane, go to app > res > layout > activity_main.xml.
                                        • Click the design tab to switch from XML source. The XML code is generated automatically.
                                        • Select the Design Surface -> Blueprint and then click Show in the Layout Editor toolbar.
                                        • Then allow Enable Autoconnection to Parent when prompted to.
                                        • Set the default Margins as 8 and 16 using the Default Margins tab.
                                        • Set the pixel to 5.5, 1440 × 2560, 560 dpi (Pixel XL) using the Device for Preview option.

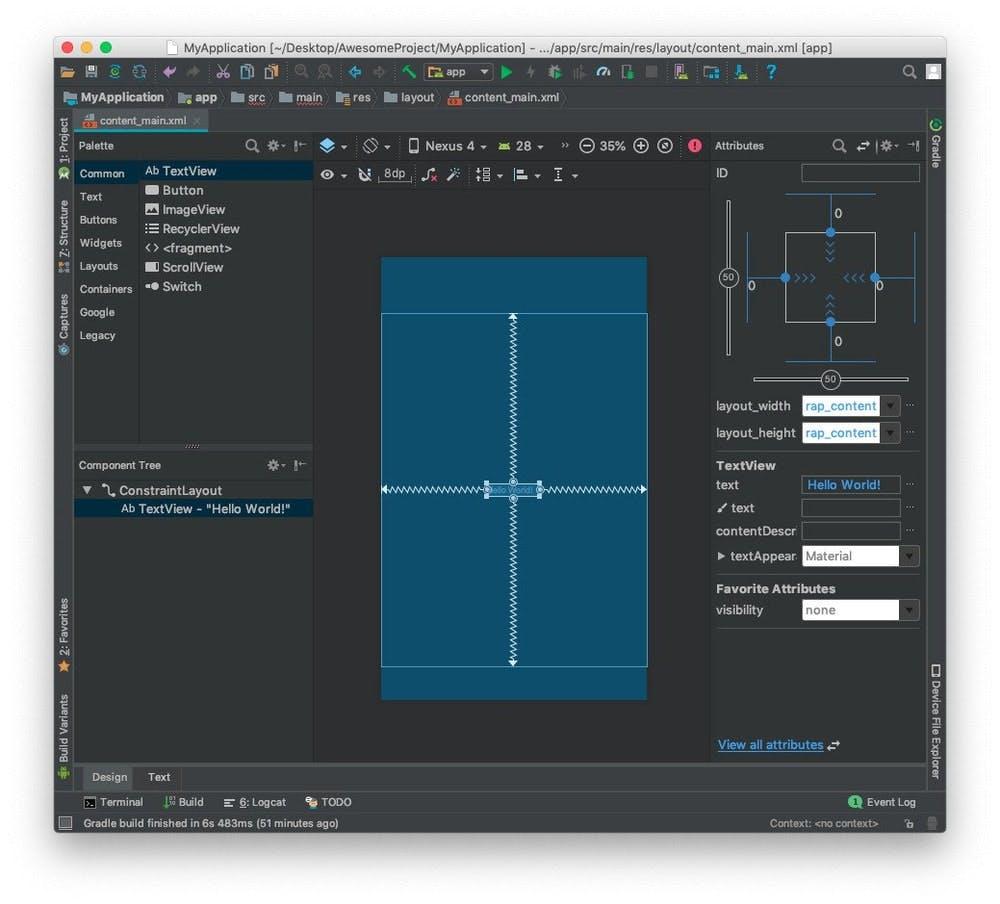
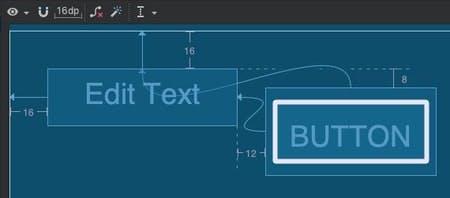
                                        This is how your Layout Editor looks like

                                        Add a text box

                                        To add a text box, follow the steps below:

                                        • First, click TextView to delete what is contained in the layout.
                                        • Click Text in the Palette to reveal the existing text controls.
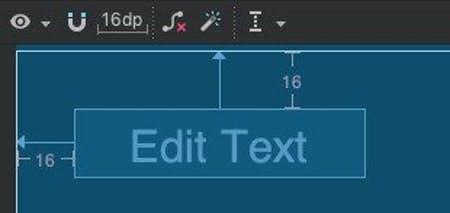
                                        • Click the Plain Text control bar (text editor widget) and drag it to the design editor.
                                        • Resize the view using the square handles by clicking on the design editor.
                                        • Create a right side constraint by dragging the anchor on the top side until it snaps. Creating a constraint helps to restrict the view within the default margins.

                                        Add a button
                                        • Click Buttons on the Palette panel.
                                        • Click the Button widget and drag it into the design editor. Place it after the text widget on the right side.
                                        • Using the steps above, create a constraint from the right side.

                                        Change the UI strings

                                        Use the following steps to adjust the UI strings:

                                        • Open the Project window and click app > res > values > strings.xml.
                                        • Open the Translations Editor by clicking the Open Editor tab. The Translation Editor helps you to edit the default settings.
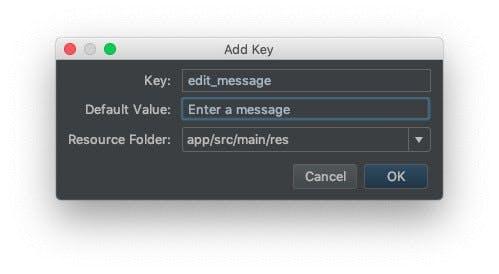
                                        • To create a new string, click Add Key to create a new string on the text box.
                                        • On the edit_message change the message and add Enter a message as the default value. Then click OK.

                                        Follow the steps below to edit the button UI string.

                                        • Click the text box in the layout.
                                        • Delete the default Name value on the Text property.
                                        • On the right side of the text box, click hint and click Pick a Resource. Then double click on the edit_message.
                                        • Locate the Text property by set as Button, then click Pick a Resource-> button_send.
                                        • Click Apply Changes
                                        • Now you can click Run to install your app and run it.

                                        Components Of Android Software Development

                                        As earlier stated, an Android app is made of components that dependently and independently respond to a user’s needs. This section discusses the types and activation of components and manifest file.

                                        Types of Components

                                        There are four main components:

                                        • Activity - This is the presentation layer of an android application. They dictate the GUI and user interaction with the GUI. Illustratively, an email application can have one activity for sign-in/signup, another one for reading emails, and another for composing a new email. Additionally, activity keeps track of what 's currently on display and previously visited activities.
                                        • Services - This is a backend operating component that manages operations long-running in the background. For example, service may be playing music in the background while the user is engaging a different application on the foreground or retrieving/sending information over the internet while the user is interacting with a separate app.
                                        • Broadcast Receivers - This is an event-driven component, also known as Intent listeners. They listen and receive broadcasts, either from the system or other applications; they then act according to the triggers set in the broadcast. Examples are alarm sets and reminders.
                                        • Content Providers - As the name suggests, they avail content stored in the file system, databases, or other applications. They act as a bridge between data and an app. For example, a media player application accesses music stored in phone storage through its content provider.

                                        Component Activation

                                        Objects managing Component Activation

                                        Your app’s Activity, Services, and Broadcast Receivers’ components are activated by Intent.

                                        Intent is your Android App’s messaging object that provides a platform for applications to call for functionalities from other components. It enables you as a user to engage other components within and outside the application.

                                        For activities and services, Intent manages requests and dictates how those requests are served. For example, an intent may convey a request to an activity to open a URL. An activity represents a single screen on the app and can be initiated by StartActivity().

                                        Intent also provides a value passing mechanism between activities; for example, an activity from your application can request for a photo from activity of another app managing photos.

                                        For a Broadcast Receiver, an Intent can simply decide the message to be broadcasted. For example, an Intent pushing for a new email notification from your email app.

                                        Android supports two types of Intents:

                                        • Implicit Intent only defines an action or data that a particular component requires from other components; the request is passed along to Android System which in turn evaluates and return registered components responsible for the requested action/data.
                                        • Explicit Intent explicitly defines the component responsible for action/data it is requesting.

                                        Content Provider component, on the other hand, is activated by an Android Object called ContentResolver. The ContentResolver is an object that acts as an intermediary between two communicating Content provider components.

                                        Methods by which Components are activated
                                        • Activity: An activity can be activated by passing a method startActivity (Intent)
                                        • Service: You start service through startService (Intent).
                                        • Broadcast Receiver: You can initiate a broadcast by sendBroadcast (Intent).
                                        • Content Provider: You can query a Content Provider by calling query () to a ContentResolver.

                                        Manifest File

                                        For Android System to engage any of your application’s component, it has to be aware of the existence of the component, its functionalities and hardware specifications. All this information about your app's components is stored in a file called Manifest (AndroidManifest.xml).

                                        This file should be located at the root of your project. The file also contains metadata of your app’s components; including themes and icons.

                                        Roles of a Manifest file are as follows:

                                        • It describes the type of components your application is composed of. Besides; it details the functionalities of these components, together with the kind of classes that implements them.
                                        • It declares permissions your app must be afforded. Furthermore, it states permissions other components must have to access your app’s components.
                                        • Declares the minimum level of Android API your app must have.
                                        • Declares your app’s hardware and software requirements; for example, a camera.

                                        Declaring Components and their Capabilities

                                        Declaring Components

                                        The essential purpose of your Manifest file is to declare your app’s components. Any component included in your app but not declared in the Manifest file will be at the bottom of this guide?

                                        Top Databases In The Market For IoT Applications

                                        Learn More

                                        If not, we will have to interlink to iOS not be recognized, hence cannot be executed. Let us look at an example; the following is a short excerpt code from an activity declaration Manifest file, and below it is a brief description of different XML tags appearing in this code.

                                        <manifest … >
                                        <application android:icon="app_icon.png" … >
                                        <activity android:name="com.myproject"
                                        android:label="@string/example label" … >

                                        </application>
                                        </manifest>
                                        • The opening application element has an attribute android:icon declaring location of the app’s icon.
                                        • In the activity element, the attribute android:name declares class name and Android:label specifies string label name.
                                        • You must declare all the components using the following elements:
                                        • <activity> for activities.
                                        • <service> for services.
                                        • <receiver> for broadcast receivers.
                                        • <provider> for content providers.
                                        Declaring Components Capabilities

                                        Among the declarations you create in your app’s Manifest file is the declaration of Intent Filters. Intent Filters are the description of intents your app's components would like to work with. When you declare an implicit Intent, the Android System sorts through the Manifest files of registered components, looking to march your declared Intent with Intent filters declared in other components. The Android System launches the component after it finds a march of intents.

                                        <?xml version="1.0" encoding="utf-8"?>
                                        <manifest … >
                                        <application android:icon="app_icon.png" … >
                                        <activity android:name="com.example.project.EampleActivity"
                                        android:label="@string/example_label" … >

                                        </application>
                                        </manifest>

                                        Declaring App Requirements

                                        As stated earlier in this article, there are billions of Android devices with different software and hardware specifications. One of the declarations you make in the Manifest file is device specifications. You describe software and hardware features your application requires for it to install and run successfully. When a user goes to Google Play to search for an app, Google Play filters applications and only return those applications whose declared device specifications conform with the user's device.

                                        For example, if your application requires a camera to function, you must make a Manifest File declaration as shown by a code excerpt below.

                                        <manifest … >
                                        <user-feature android:name="android.hardware.camera.any"
                                        android:required="true" … >
                                        <user-sdk android:minSdkVersion="7" android:targetSdkVersion="19" … >

                                        </manifest>

                                        With the kind of declaration above, Google Play prevents any device with no camera to install your app. You can declare a hardware/software specification as recommended, but not required; in this case, you set the required attribute to false.

                                        Privacy and App Permissions

                                        At the core of the user's app’s consumption is privacy. An Android App user’s privacy is protected by Android’s permission feature. A user’s sensitive information (such as contact list and messages) and device functionality (such as a camera) are protected through permission. Your app, in installation or runtime, must seek permission from the user to access these features.

                                        By default, your application is not permitted to operate in a manner that destructively impacts user’s information, device system and other applications. For example; it is not permissible for your app to read/write user's and other app's information, or manipulate a device's operating system. You can learn more about the app's permissions here.

                                        App’s Permission Declaration

                                        You must declare permissions your application requires in the Manifest file. Permissions are declared through <uses-permission> element. Permissions are applied using Android:permission attribute. For example; you build a dangerous declaration like the one below if your application requires permission to send an SMS.

                                        <manifest … >
                                        <user-permission android:name="android.permission.SEND_SMS" />
                                        <application … >

                                        </application>
                                        </manifest>
                                        Types of Permissions
                                        • Normal Permissions: These are permissions that are automatically granted by the Android System without the user's knowledge. Normal permissions pose no risk to a user’s privacy or the normal operation of a device system; for instance, permission to access the internet.
                                        • Signature Permissions: These are permissions automatically granted by the Android system by having both the requesting application and the application that declared those permissions signed with the same certificate.
                                        • Dangerous Permissions: These are permissions that are explicitly granted by the user. They pose a risk to the user's data or the system's regular operation
                                        Components Enforcement of Permissions

                                        Permission enforcement differs according to your app’s components.

                                        • Activity permission enforcement: Permission applied to tag determines who can launch your app’s activity component. The permission is checked during Context.startActivity() and Activity.startActivityForResult(). If the caller doesn't have the required permission then SecurityException is returned.
                                        • Service permission enforcement: Permission applied to tag determines who can initiate your app’s a Service. Permission is checked during Context.startService(), Context.stopService() and Context.bindService(). If the caller doesn't have the required permission, then SecurityException is returned.
                                        • Broadcast Receiver permission enforcement: Permission applied to tag determines who can broadcast to your app’s receiver component. Permission is checked after Context.sendBroadcast() returns. A permission failure results in a stop in Intent conveyance.
                                        • Content Provider permission enforcement: Permission applied to tag determines who can access data in ContentProvider. android:readPermission determines who can read from ContentProvider, while Android:writePermission decides who can write into ContentProvider.
                                        Check and Request for Permission

                                        As a developer, you build your app to check whether it has permission to access features and data from the device or other applications. You invoke ContextCompat.checkSelfPermission() method to check for permission. The following Kotlin code except checks whether an app’s activity has a right to write to the calendar.


                                        if (ContextCompact.ContextCompact.checkSelfPermission(thisActivity, Manifest.permission.WRITE_CALENDAR) != PackageManager.PERMISSION_GRANTED) {
                                        // Permission is not granted
                                        }

                                        The invoked method returns PERMISSION_GRANTED if your app automatically has permission; otherwise, PERMISSION_DENIED is returned. You can query the user for permission by invoking requestPermissions(). This method, if successfully executed, brings up a prompt box that requests a user to grant permission. In some instances, it is advisable to provide reasons why your app needs permission. For more information on App permissions, check out Permissions overview and App permissions best practices.

                                        Best Mobile App Development Practices for Android

                                        There are a few best practices to be followed in Android App Development to ensure your apps are seamless in their user experience and blow the competition out of the water. While some of the best Android App Development Companies follow these practices, not everyone out there does. So ensure you keep these practices in mind

                                        A Leading Android App Development Company

                                        Learn More

                                        Dependency Injection

                                        Dependency is a common characteristic when it comes to programming. Classes interoperate, referencing each other within their ecosystem. Dependency injection is a concept that involves an app’s classes being provided with dependencies instead of creating their own. Dependencies are Initialized elsewhere and passed on to the classes that require them. Dependency Injection happens in two ways

                                        • Field Injection directly passes dependencies to classes.
                                        • Constructor Injection involves passing of dependencies to the classes through constructors.
                                        • The following is a snippet showing implementation of dependency injection through Dagger.

                                        class MainActivitySample(private var mainRepo:MainActivityRepo) {
                                        fun performFun() {
                                        mainRepo.fetchData()
                                        }
                                        }

                                        MainActivityRepo is a dependency initialized elsewhere and passed on to MainActivitySample class.

                                        Testing

                                        Testing in App development is one of the core stages. Testing happens before deployment and during use. Employing a modular architectural approach is advisable when building an Android app. With this approach, you separate coding blocks according to the tasks they perform; this makes it easier to test because you are working on a few codes one at a time.

                                        Setting a Testing Environment

                                        Following are best practices in setting up a testing environment.

                                        • Test directories: Systemize your test directories in Android Studio according to your available test environments. For example; have all the test files meant for virtual devices in androidTest directory and place test files that execute on your machine in the Test directory.
                                        • Test devices: Prepare different types of devices to test your app; real devices, virtual devices, and simulating devices. Simulating devices offer the highest reliability.

                                        Noting down Evaluative Tests

                                        After you have set up a testing environment, write down tests that you can evaluate your application with. The following are three categories of tests you can use:

                                        • Small tests: These are tests that you use to assess the performance of each of your classes.
                                        • Medium tests: Medium tests validate the interaction between classes in a module. Refer to Espresso Intents library for Medium tests.
                                        • Large tests: These tests gauge interaction between your app’s modules

                                        Testing up the ladder from small to large tests offers the ability to debug efficiently. Kindly refer to these resources at Android testing samples and Android Testing Codelab for more information on testing and Android app.

                                        Accessibility

                                        As a developer, you are encouraged to build an app that everyone can interact with. Users with impaired vision, hearing and other disabilities should be part of your consideration while developing an Android app. Development guideline to assist you in coming up with an easy-to-use android app are as follows:

                                        • Text Visibility: Font and background colour and text size are some of the elements that should be addressed. There should be an obvious distinction between font and background colour. Accessibility Scanner is an Android app that can assist you in determining the right contrast for your app layout.
                                        • UI Controls: Controls in your app’s layout should be straightforward, clear and large.
                                        • Describe UI elements: Add a functionally related description to items in your UI surface, you use content Description attribute for description.

                                        Android Application Development FAQs

                                        How Long will it Take to Make an Android App and Launch it?

                                        It depends on several factors; core among them is the skill set of your developer and how big the application is. An application with a lot of features and functions takes a while. Launching an Android app is a few minutes' processes, as long as everything is set (for example, Android account setting)

                                        How Essential is App Testing for an Android Developer?

                                        App testing is among the core phases in app development. It allows you as a developer to evaluate your app’s functionality and consistency.

                                        How to Build Android Apps using React Native?

                                        For this task, you will need to download React Native and install Android Studio. For step by step process on building an Android app with React Native, kindly refer to our React Native Development Guide.

                                        Is Setting Permissions an Important part of App Development?

                                        Yes. For an application dependent on user’s information or device functionalities to fully function; it must declare permissions in its Manifest file; otherwise, it will not get any access to outside features it needs.

                                        How Much Does it Cost to Develop an Android app?

                                        Outsourcing expertise depends on what your developer charge rates. Application complexity is a significant factor in outsourced development. Deploying an app to the Android market requires you to have a developer account that currently costs a one-time fee of $25.

                                        How to Make an Android App from Scratch?

                                        Building an Android app from scratch is not difficult. First, you need to have the mobile app requirements, then you need to download and install Android SDK. Finally, ensure you have the required skills. Kindly refer to previous sections of this article or Android’s “build your first app” for a step-by-step process on Android app development.

                                        How to Create an Android App that is User-friendly?

                                        For startesr; have a clean, clear and simple user interface. Functionally, your Android app should be fast, consistent and less consumes fewer resources (for example, phone energy).

                                        How to Become an Android App Developer?

                                        The best way to become an Android developer is to first the preferred programming language. Then, you can learn how to code using Android by watching video tutorials or enrolling in an online course.

                                        If you want to build an Android app using Java, you need to first install Android Studio IDE.

                                        How to Build an Android App using Java?

                                        For a detailed Android app development using Java, kindly refer to previous sections of this article or Android’s “build your first app” for a step-by-step process on Android app development.

                                        JAMStack Development
                                        Hire our expert Android app developers

                                        Let’s Talk

                                        Let us know if there’s an opportunity for us to build something awesome together.

                                        Drop the files
                                        or

                                        Supported format .jpg, .png, .gif, .pdf or .doc

                                        Maximum Upload files size is 4MB